So far on my clock the materials I have used include:
Sustainability
Timber- (for the base of my clock)
Cardboard- (we have used cardboard for our layers. We stick our layers on the cardboard then we cut the cardboard out with pliers and then we uses scissors to cut out the fine parts)
sand paper- (We use sand paper to sand the edges of the timber to make them smooth and soft)
Thermoplastic- (we use this on the vacuum former to mold our design)
Some
issues associated with plastics on the environment are:
- Plastic is a lot of pollution on the beaches especially in the water e.g turtles they live in the water and they mistake plastic bags for jelly fish and the plastic bag gets stuck in their stomach and then they die.
- plastic bags are usually just left on the floor and the wind could carry them to another animal and it could fly onto its head and get stuck so the animal would suffocate and die, in the same case as the turtles.
Steps you and your family can take to reduce plastic consumption and protect the environment are:
- always recycle e.g. plastic bags and glass bottles
- don't litter, always put your rubbish in the bin
- if you see any rubbish lying around pick it up and put it in the bin
- to reduce plastic consumption instead of using wrappings or glad wrap or any of that sort of stuff you could just put them in containers or boxes. This helps the amount of plastic and wrappings lying around.
Wednesday, 21 March 2012
Sunday, 18 March 2012
11th lesson of DF
In DF, because I had finished my layers and vacuum formed all I had to do was paint my clock. I painted it during DF and had to finish the rest at home. Mr Andrews said the layers can't be too thick or too thin. If there too thin you would be able to see little patches of light beaming through it. Once I had finished painting my clock, I had to let it dry, and that took a long time, I even tried to dry it with hairdryer. Now all I have to do in the next lesson of DF is put in my clock piece and then I'm finished, making my clock.
My clock painted:

My clock painted:

Wednesday, 14 March 2012
10th lesson of DF
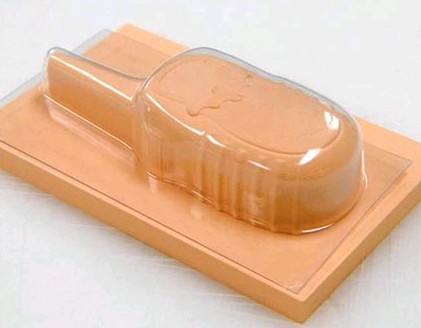
FINALLY, I have vacuumed formed my clock. At the beginning I had to just finish off my layers but it didn't take me very long. Once I had finished my layers I showed Mr Andrews and he said it was good but all I had to do was just sand one of my layers because it was a bit messy. He also said that with my shoelaces because there so SMALL I had to glue them not with a hot glue gun but just normal glue because they were so small. Once I had fixed up my layers and glued my shoelaces I then went to the hot glue gun. It was exciting using one of them because I had never used one before. I was scared I was going to burn myself, but I didn't. Once I finished that I went to go get it vacuumed formed. It was exciting watching the process and nerve racking at the same time because I was wondering if the clock would come out of the plasic in one piece and if the layers would get stuck on the plastic, but it didn't. So all I have to do now is paint it and then get my clock piece.
My clock, vacuum formed:

My clock, vacuum formed:
Tuesday, 6 March 2012
8th lesson of DF
In DF today we were in the workshop, working on our clocks. I was up to my layers, so next lesson all I have to do is finish off my layers and then I'm up to vacuum forming. I haven't had any troubles so far with the making of the clock and hopefully I don't. During the lesson I found it hard to do some of the layers, such as my shoelaces, because I'm doing a convers shoe clock it has shoelaces. The shoelaces are really small so it is really hard to cut them out and make it perfect, so I will be taking a bit of time on doing the shoelaces next lesson but hopefully I will be able to vacuum form in time for the lesson to finish.
Tuesday, 28 February 2012
7th Lesson of DF
In DF today we stayed in the computer room because Mr Andrews was away on camp with grade 8. We just worked on our assignment and updated our blogs and that sort of stuff. I had a bit of trouble understanding what we actually had to do on our assignment but then I got it. I've started making a lot of progress on my clock. I'm up to making my layers such as sticking them on cardboard and then cutting them and sticking them on your design.
This is my clock so far:

This is my clock so far:

Definitions
I am going to give you definitions of thermo and thermosetting plastics.
Firstly, I would like to start off with thermoplastics. Thermoplastics can be reheated and shaped in various ways. They usually become mouldable after reheating. The bond between the molecules is weak and become weaker when they are reheated, allowing them to reshape. Thermoplastics tend to be composed of 'long chain monomers'. These types of plastics can be recycled.
Secondly, Thermosetting plastics. Thermosetting plastics are that once their set these plastics cannot be reheated, soften, shaped and mould. The molecules of this plastics are cross linked in three dimensions and this is why they cannot be reshaped or recycled. The bond between the molecules is very strong.
Some examples of thermoplastics are:
. acrylic
. Polythene
. Polyvinyl chloride (tough material)
. polyethylene (grocery bags, shampoo bottles, plastic bottles and children's toys)
. polycarbonate (means it can be shaped and formed through a number manufacturing processes.
Examples of thermosetting plastics:
. adhesives (glues)
. Polyurethane (This forms the basis of many paints and varnishes because it is very tough and has
water resistant qualities)
. Urea Formaldehyde (UF): (Urea Formaldehyde has physical properties of high hardness and high toughness, making it suitable for strong, knock-resistant electrical fittings.)
. Polyester resins
Thursday, 23 February 2012
6th lesson of design futures
In DF today we finally made it into the workshop and started on our clocks. Mr Andrews cut out my clock design on saw machine which was really cool because it made a really pitchy sound that hurt your ears. Once he cut out my clock we had to sand the edges with sand paper. The sand paper is actually a piece of paper with special material on one side used for sanding timber. We had to do this to make the timber soft and smooth on the edges. Later on in lessons we will be using a vacuum former which is the machine used to melt plastic and to go over our design (cover it). The process is first you have melt the plastic by pushing a button and leave for about 3 mins, then once thats done you just place your clock on the surface push the lid down and you need to pump the pump so that the plastic moulds onto your design. Some examples of made things by the vacuum former are:
Example 1:


Example 1:
Example 2:

Example 3:

This is a vacuum former
Subscribe to:
Comments (Atom)